It is a best practice to thoroughly test all notifications before delivering them to participants. The following article details how you can test your notification content, send notifications to participants, and troubleshoot potential issues. See Participant Notifications Overview for general information on notifications and related articles.
Testing Notifications
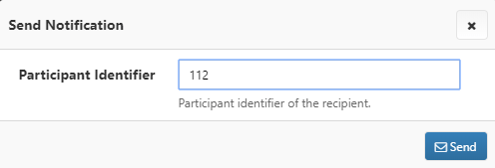
The envelope icon will send a test notification so you can check out how the message looks when delivered.

You will be prompted to enter the identifier of the participant who will receive the test notification. You can find participant identifiers in the participant viewer.
You may want to create a fake/test participant in your project linked to your own phone/email for test purposes.
If there is a problem delivering the message, the system will display an error message explaining why. If the system says that the delivery was successful but the participant did not receive it, see the next section for troubleshooting tips.
Sending Notifications
There are 3 different ways you can send a notification to a participant:
- To schedule notification delivery on a specific day, on a periodic basis, or based on events in the participant experience, please see Scheduling Survey Delivery.
- To send a notification to a group of participants based on pre-set criteria, please see Performing Actions With a Segment.
- To send a notification to a particular participant please use the Notifications Tab in the participant viewer for the participant of interest.
By default, an email/SMS notification will be delivered to the email address/phone number that is stored in the demographic field for the participant. However, you can also create custom fields to store additional phone numbers and email addresses and send notifications to those.
SMS notifications are sent from a static number. Refer to SMS Notification Exports or contact us (mdh-designer-support@careevolution.com) to confirm the notification number.
Troubleshooting Notifications
If a participant is having trouble receiving notifications, check the "Notifications" tab in the participant viewer to see what notifications have been delivered to that participant.

The "Delivery Status" column indicates whether the notification was delivered successfully, so check there first to see if there are obvious errors. For example, if it says "MissingContactInfo" for an SMS or email notification, the participant may not have a mobile number or email address on file.
The “Delivered To” column displays the email or mobile number to which the notification was sent. If a push notification was sent to the participant, the “Delivered To” column will show “N/A.”
The “Sent By” column identifies the MyDataHelps Designer user or schedule responsible for sending the notification.
If you believe the notification should have gone through, but the participant still isn't receiving it, there are a few additional things you can check:
- Make sure their contact information (email and/or mobile number) is correct.
- For emails, make sure the email isn't being routed to their spam folder.
- For push notifications, make sure the participant hasn't disabled notifications in their device settings. Participants must also have the MyDataHelps app downloaded and be logged in for push notifications to be received.
If the problem persists, contact us for additional assistance.