Creating a Survey
Start by navigating to either the home screen or the surveys screen. Enter a survey name where it says “New Survey Name” and click “Add Survey.”

You will arrive at the survey editor where you can begin creating the survey content.
Selecting a Survey Type
The first thing you may see when setting up a new survey is the survey type drop-down on the top left of the editor. Most surveys that you will create will probably be a “Standard Survey,” but, in some cases, you may also want to deliver an Ecological Momentary Assessment or an active task.

Adding Steps for Standard Surveys
Surveys are simply a series of steps that are presented to the user. By default, they are presented in sequential order, but you can add branching rules to skip steps depending on the participant’s answers.
If you are creating a standard survey, begin by clicking “Add Step” to add a step to your survey. Select “Step Type” on the right to select from question steps, instruction steps, consent steps, and more.
For each question in a question or form step, MyDataHelps supports various answer formats.
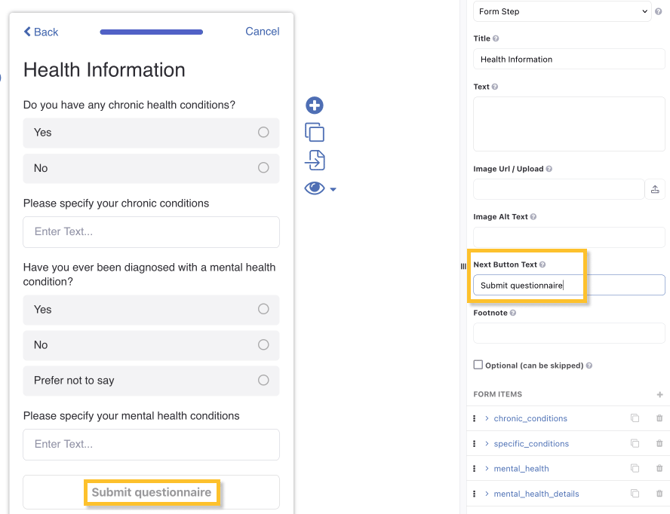
When you make changes to the step properties on the right, you will see the changes immediately reflected in the preview view in the middle of the screen. For example, you can change the default button text of "Next" or "Done" at the bottom of the survey step by editing the "Next Button Text Text" field. This field can also be localized.

For simple surveys, the "Try It Out" button will let you test your survey without collecting any data. You can also click on the eye icon to try out your survey from a particular step. See Testing Projects and Surveys for more advanced testing options.

Identifiers
For each step or form item (for a form step) you create, it’s important to use a meaningful identifier. The identifier is the key by which the data for the step will be stored. For instance, if you have a question with the identifier of “SMOKING_LASTYEAR” the result of that question will be stored in a variable called SMOKING_LASTYEAR.
Advanced Survey Options
Participants who don't complete a survey in one session can save their progress and complete it later. These options are found in the "Advanced" dropdown in the left pane, and saving progress is enabled by default. You can prevent ever saving participants' survey progress, disable the prompt which asks participants if they want to save, and customize the text of the "Cancel" button shown on each step if desired.

If a new version of the survey has been published since the participant previously saved their progress, they will restart at the beginning of the survey.
The Cancel Prompt offers the choice to save or discard survey results, if enabled.

Updating Survey Properties
Refer to our Survey Properties article for more information on configuring various survey properties.
Categorizing Surveys
Surveys can be categorized in the Survey Tab and within the Survey Properties. Categorizing surveys allows you to easily filter your surveys by group rather than searching through all of your project’s surveys.
The Survey Tab option can only be used when creating a new categorized survey. Existing surveys should be categorized within the Survey Properties.
Filtering Surveys
To filter your surveys based on Survey Category, select the Filter by category dropdown in the Surveys tab. Select the desired survey category. The surveys in the list will automatically filter all of the workspace’s surveys by the designated category.

Versioning, Saving, and Publishing
Refer to our survey versioning & publishing article for more information.