It is essential to perform testing on your project before beginning to enroll participants, as well as any time changes are made to the existing participant flow.
As mentioned in the Pre-Launch Playbook, we recommend creating a "Dry Run" project when you first begin project configuration. A "Dry Run" project is one that is configured and kept specifically for testing. This project will typically contain "Dry Run" as part of the project name to denote that it is a testing project.
Once you are ready to enroll participants, you can copy your "Dry Run" project to create your "Production" project (e.g., if you are designing a Wellness study, you would have two MyDataHelps projects: "Wellness Study Dry Run" and "Wellness Study Production"). The Production project should be used to enroll actual participants, whereas Dry Run should only contain test participants.
After enrollment has begun, Dry Run can be used for testing any potential changes, before making those changes in Production. It is recommended to keep configuration (e.g., schedules, segments, etc.) the same between both Dry Run and Production to ensure accurate testing.
Pre-Enrollment Testing
Depending on the scope, projects can require three to four weeks of thorough testing before enrolling participants. The following is a list of best practices for testing your Dry Run project:
- Test the full experience as a participant (including enrollment, sensor data, surveys, notifications, etc.).
- Test on all platforms offered for the project (i.e., iOS, Android, and/or Web).
- Test all available languages, if applicable.
- Set up and test data exports.
Testing the Enrollment Flow
Since there are a variety of enrollment methods to choose from (Invitation, Code, Search, Recruitment Surveys), this piece will be unique to your project. However, it is essential that you test all anticipated enrollment flow(s) to ensure that the participant experience is seamless.
If utilizing email invitations, make sure to test any links within the emails. Additionally, emails should be tested on several different email clients (e.g., Gmail, Apple Mail, Outlook, etc.) to ensure that they appear as anticipated on each.
Testing the enrollment flow will likely require you to create a MyDataHelps account. You may create as many test accounts as you like, but they will each need a unique email address.
Many email providers, like Gmail, allow you to overlay multiple email addresses onto a single account by using the "+" symbol followed by some extra text.
For example, you could have somebody@gmail.com as your primary administrator account, and then use somebody+1@gmail.com and somebody+2@gmail.com as test accounts. All emails will come to your single Gmail inbox, but they will be treated as separate user accounts by MyDataHelps.
Once you’ve created your account, confirm that the app appears as expected:
- All of the appropriate tabs display (see Creating and Testing Views for more information on testing custom tab views).
- Any surveys that are delivered on enrollment appear.
- The project, workspace, and logo appear correctly on the Account tab.
Creating Additional Test Participants
Once you’ve tested the enrollment flow, if you still need to create additional test accounts (or if you decide you need another test account later on), you can quickly enroll new test participants using the project homepage.
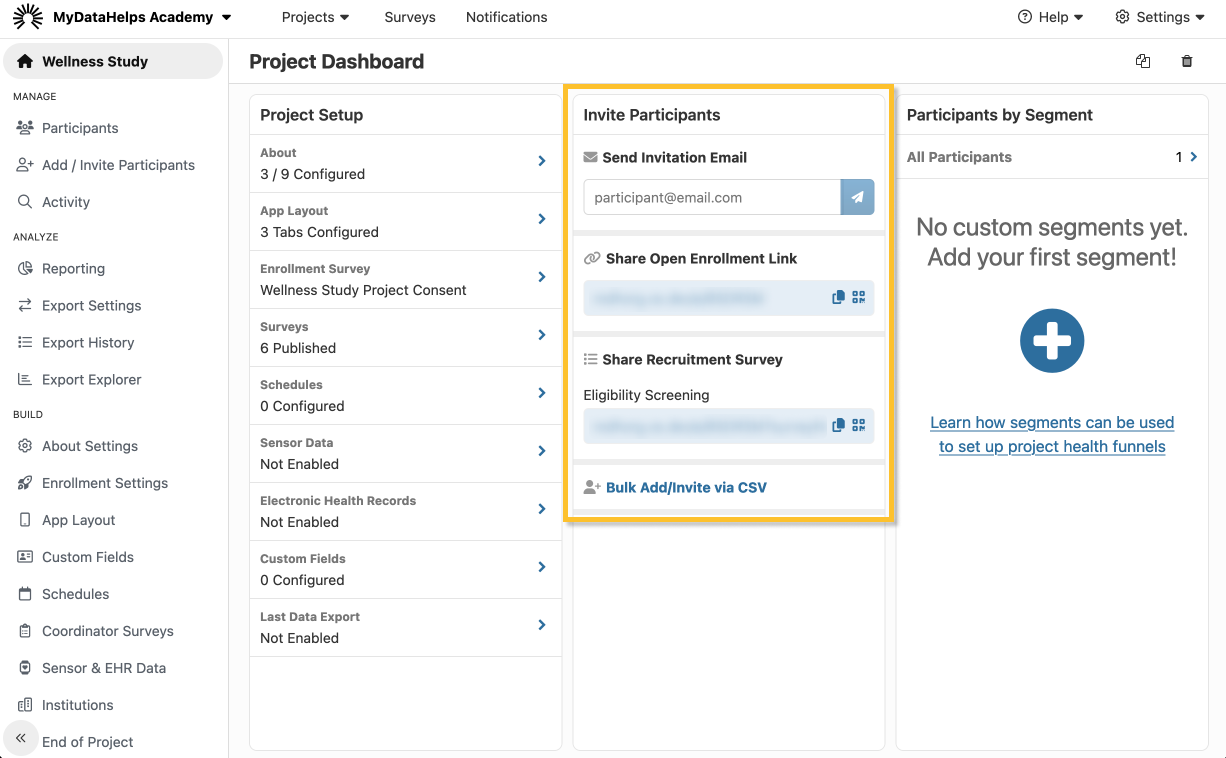
This section of the homepage will only display enrollment methods that are enabled for your project (e.g., if your project allows open enrollment, you will see open enrollment link and QR code).
Testing Sensor Data
If your project has enabled sensor data, confirm that you are able to connect any relevant devices to your test participant.
Once the device is connected, it may take a few minutes to transfer to MyDataHelps. To confirm that the data is being shared, navigate to the Participants tab, click on your test participant, then navigate to the corresponding tab (e.g., Apple HealthKit, Fitbit, or Google Fit).
Alternatively, you can validate the data by viewing the data exports.
Testing Surveys
When you initially create a survey, you can use the "Try It Out" button in the survey designer to view an interactive preview of the survey in your browser, without saving any data.
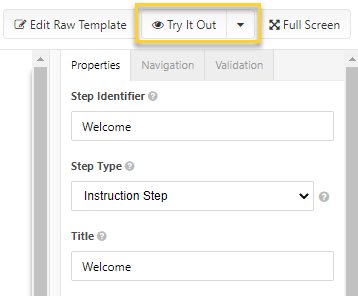
You can click the "Try It Out" drop down to view a survey as a particular participant. This can be useful if you have participants who might have different survey experiences, e.g., if navigation logic sends them to different steps than another participant.

You can also choose to try your survey beginning at a specific step by click the eye icon next to your step:
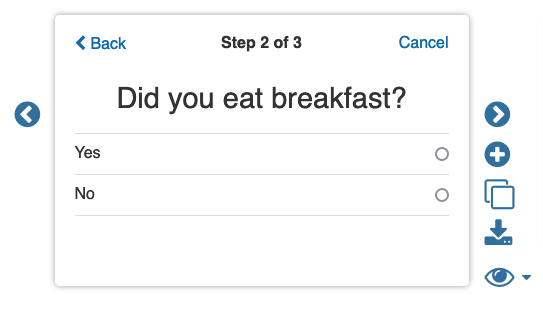
There are limitations to the interactive preview. You will not see the "Try It Out" button if your survey contains device-specific features like image/video capture steps or Active Tasks. You cannot test branching logic dependent on participant data. Finally, the interactive preview presents only a single survey in isolation. It does not allow you to test the enrollment process, survey delivery, or other important aspects of your project.
The "Try It Out" tool is a great preliminary testing feature; however, you should also test surveys by sending them to your test participant and completing them, verifying:
- Any responses that populate demographic or custom fields are saved. Navigate to the Participants tab, click on your test participant, then navigate to the Participant Info tab to confirm.
- Navigation and/or validation logic works as anticipated.
- Images and videos appear correctly.
- If submitting the survey triggers a follow up action, confirm that the action occurs (e.g., a new survey becomes available or you receive a notification).
Testing Notifications
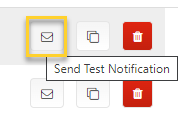
You can quickly send a test notification to your test participant by clicking on the envelope icon on the right hand side in the Notifications tab. Similar to the survey "Try It Out" feature, you will need to have a test participant created first.
In addition to sending test notifications via the Notifications tab, we also recommend sending notifications to test participants (either manually via the Participants tab or via testing schedules). See the following tips for testing notifications:
- If using survey or tab links, confirm they direct you to the expected survey or tab.
- If testing email notifications, test them on multiple email clients (e.g., Gmail, Apple Mail, Outlook, etc.).
- Confirm all images appear clearly.
Testing Schedules
Schedules should be tested whenever possible to ensure they trigger at the appropriate time.
- For "On Enrollment" schedules, make sure they trigger when you complete enrollment for your test account.
- For "On Entering Segment" schedules, create a test participant that meets the criteria to enter the corresponding segment, and ensure that the schedule triggers.
- For "On Meeting Criteria" schedules, create a test participant that meets the specified criteria, and ensure that the schedule triggers.
- For schedules "Based on Participant Events", ensure that the test participant goes through those events.
If the participant event is based on a date custom field, you can navigate to the Participants tab, click on your test participant, then navigate to Participant Info to update the date of the custom field if needed.
- For schedules “Based on a Specific Date,” change the date/time to one that is close to your current date/time while testing, then make sure the schedule is updated accordingly in the Production project.
To review which surveys and notifications were sent to participants, you can navigate to the participant record, checking the Survey Tasks and Notifications tabs. If configured correctly, data exports would also contain a history of what was sent out.
For more information on testing schedules, refer to the Viewing, Editing, Copying, Deleting, and Testing Schedules article.
Testing Exports
We recommend setting up and testing the Data Exports in Dry Run first to ensure all of the test data is flowing through as anticipated. Additionally, we recommend setting up exports in Production before enrolling participants as well.
If you will be uploading your data exports to an SFTP server or S3 bucket, confirm that those connections have been established.
Testing Additional Languages
If your project has been configured for multiple languages, you will need to test surveys, notifications, and the app with each language. See the testing section of Configuring Your Project for Multiple Languages for more information.
Post-Enrollment Testing
Your project may require changes after going live/beginning enrollment, which generally should be tested in Dry Run before rolling out to participants, including, but not limited to:
- New or updated survey(s)
- New or updated notification(s)
- New or updated app tab(s)
- New or updated schedule(s)
These changes should be made first in the Dry Run project, tested fully as a participant, then implemented in the Production project.
Example
For example, let’s say that you will be sending participants a new quarterly survey on 6/30/2023 at 9 AM, and at the same time, you also wish to send a push notification alerting them that it is available. When clicked, this notification takes the participant directly to the survey within the mobile app.
First, you should create the survey and publish it to the dry run project. Next, create the notification that contains the link to the corresponding survey. Finally, you should create the schedule in Dry Run that sends both the survey and notification.
Once the schedule is created, you should test this new flow with one of your test participants in the Dry Run project. Ensure that you are logged into the mobile app as your test participant so that you receive the push notification.
Since this schedule is based on a specific date, you should edit the date/time when testing so that the schedule triggers for you. For example, if the live schedule should trigger on 6/30/2023 at 9 AM and it is currently 6/15/23 at 10 AM, you could set the schedule to trigger on 6/15/2023 at 10:15 AM in Dry Run for testing. Just make sure that the schedule has the correct time when you add it to the Production project!
Once you receive the push notification, click on it and confirm that it opens up the survey in the app.
Confirm that the survey works as anticipated, responses are saved (Participants > click on your test participant > Survey Results), and all relevant participant fields (Participants > click on your test participant > Participant Info tab) are saved.
If your project is available for both Android and iOS, you should test the flow on both mobile apps.
Once testing is complete:
- Publish the survey to the Production project
- Add the schedule to the Production project (ensure it has the right date/time!)
No further action is needed for the notification since notifications are shared across your workspace.
Testing Updates in Production
There may be instances where you wish to test an update in the production environment as well before rolling out to participants. If you need to enroll a new participant in the Production project, we advise clearly noting that it is a test participant (e.g., using a different convention for the participant identifier or making the last name "TEST").
When you've finished testing, you should either delete the test participant from the project or exclude them from data exports. Either way, this will ensure that test data is not co-mingled with real participant data. See Excluding and Removing Participants for details.