Exporting data from MyDataHelps enables you to analyze and present project data in the format and applications of your choice. This article describes in detail the configuration options available to tailor data exports for your project.
Data exports may contain Protected Health Information (PHI), Personally Identifiable Information (PII), and/or other health-related sensitive information, and must be transferred/stored in accordance with your organization’s security policies in order to ensure participant privacy and data security.
To set up data exports:
- Go to your project and select the "Export Settings" tab.
- Select your export settings, described below.
- Click "Save Export Settings" to save your settings.
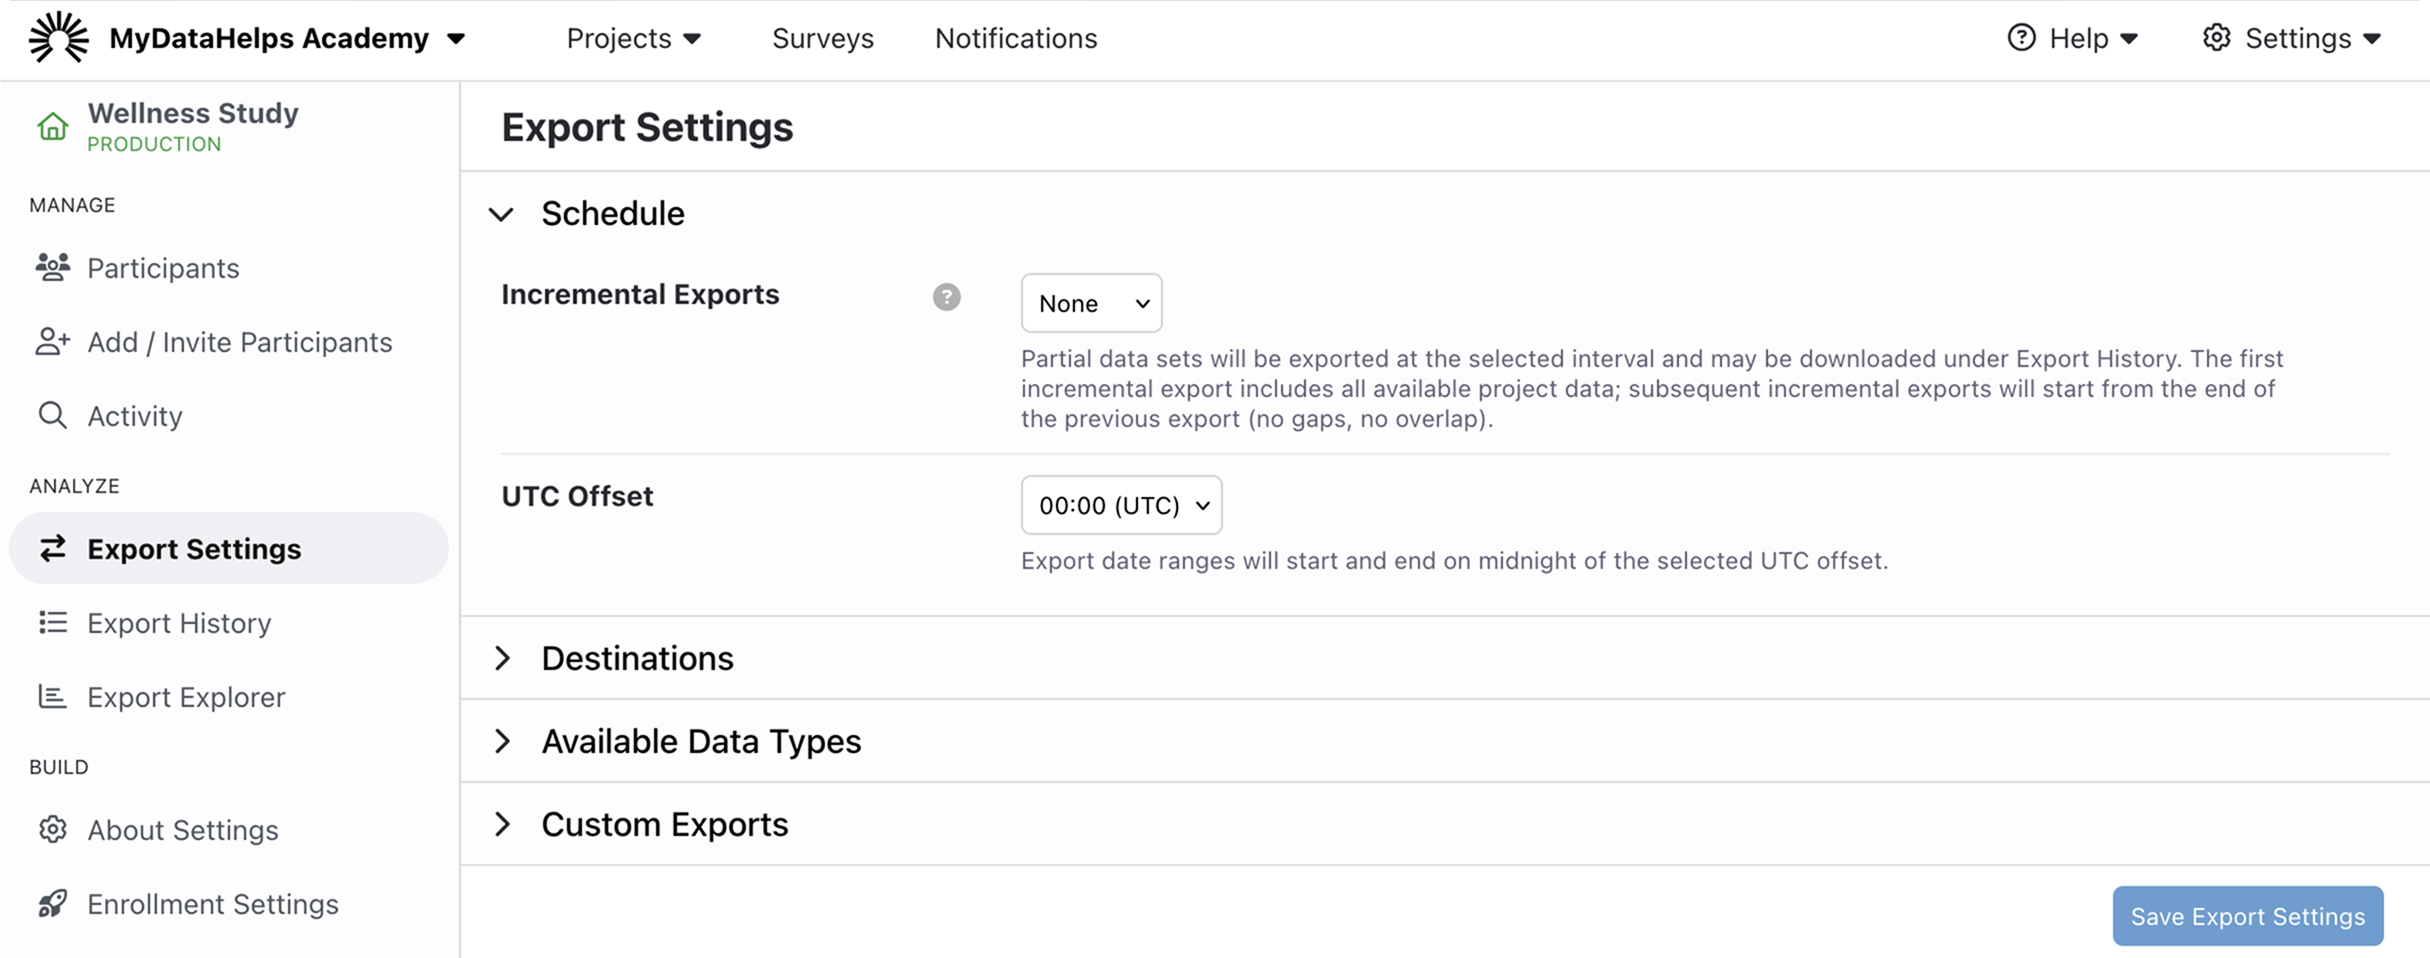
Schedule
You can configure your project to perform daily or weekly incremental exports. For weekly exports, you may also select the day of week when the export will occur.
Data exports will begin at the next scheduled interval. For example, if you set up your project to export data weekly on Monday, and it's currently Tuesday, your next export will not occur until the next Monday.
Available options include:
| Setting | Function | Examples |
|---|---|---|
| Incremental Exports |
The interval when incremental exports will be generated. See Incremental Exports for more information. Note: Selecting "None" will disable exports entirely. |
None, Daily, Weekly |
| UTC Offset |
By default, exports are performed at midnight UTC on the selected interval (daily/weekly). You can select a different time of day by changing the UTC Offset setting. Note: MyDataHelps Designer will never export less than 24 hours worth of data. If you're using daily exports, changing the UTC Offset may push your next export back a day. |
00:00 (midnight) UTC |
Destinations
You can configure your exports to be delivered to various locations or have the export database synced to an Amazon S3 bucket. Available options are listed here and described in detail below.
Delivering export data to these destinations requires approval from CareEvolution. Please contact us if you need this enabled for your project.
| Setting | Function | Examples |
|---|---|---|
| Upload to SFTP Server | Whether the incremental data exports should also be uploaded to your own Amazon S3 bucket. | Yes/No |
| Upload to Amazon S3 Bucket | Whether the incremental data exports should also be uploaded to your private SFTP server. | Yes/No |
| Sync Export Database To Amazon S3 Bucket | Whether to upload Export Explorer parquet files to your own Amazon S3 bucket. See below for details. | Yes/No |
Upload to SFTP Server
If SFTP upload is enabled, you will need to enter information about your SFTP server so that MyDataHelps Designer can upload export files.
Please check with your organization's IT Support for assistance setting up SFTP.
To set up SFTP upload:
- Check "Upload to SFTP Server."
- Enter all the required server information. See below for details.
- Click "Test SFTP Upload" to perform a test upload to the server.
- Check the specified directory on your SFTP server to ensure the upload was successful.
- Save export settings.
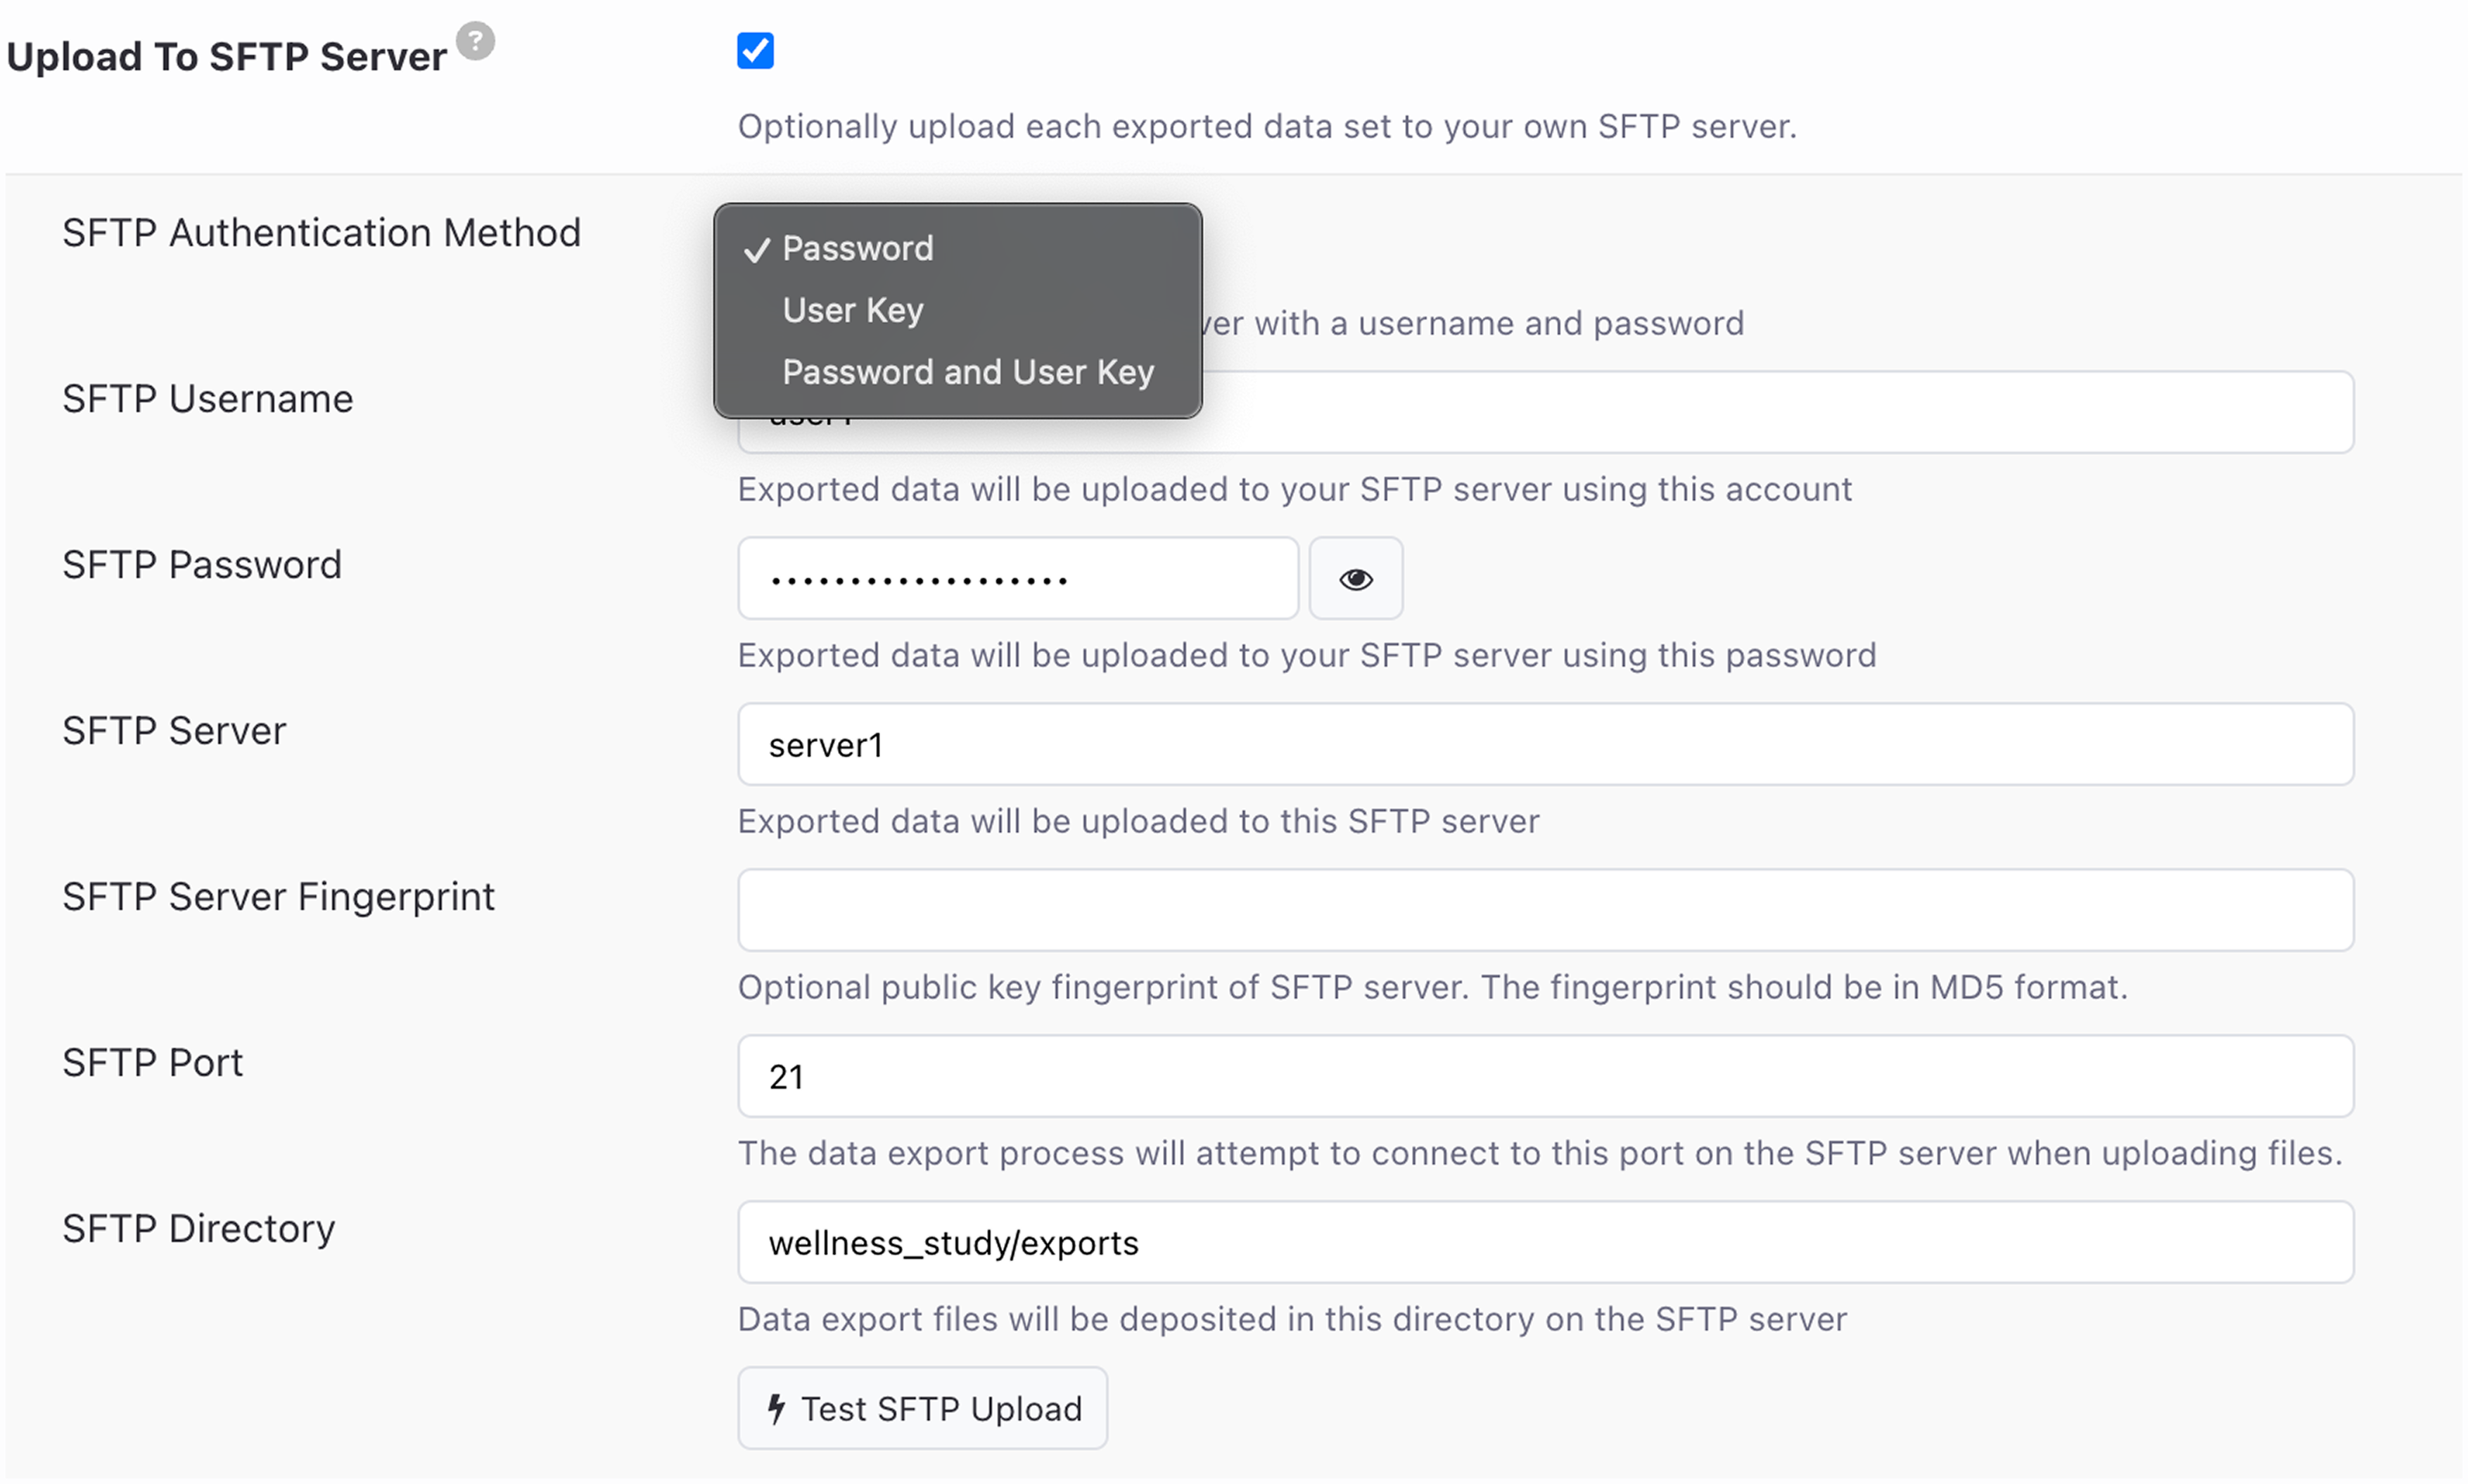
When setting up SFTP uploads, you can choose from several authentication methods:
- Password
- User Key
- Password and User Key
The "User Key" option allows you to connect to your SFTP server using a private SSH key, which is more secure than a password.
We recommend that you use the OpenSSH ssh-keygen command to generate your SSH keys. The private key should be generated in the PEM format, which you can check by verifying that the key file starts with "----BEGIN RSA PRIVATE KEY----". Older versions of ssh-keygen will default to the PEM format, but current versions require that you provide the "- m PEM" argument.
For an additional layer of security, you can enable both a password and a user key with an optional passphrase.
Whatever authentication setting you select must match the configuration on your SFTP server.
You may also enter the public key fingerprint (in MD5 format) so that MyDataHelps Designer can verify your server identity before transferring files.
In addition to the security options, you will need to configure the server host name, port, and a directory where the files will be stored.
Upload to Amazon S3 Bucket
In order for MyDataHelps Designer to upload the export files to your own S3 bucket, you will need to do the following:
- Check "Upload to Amazon S3 Bucket."
- Enter the S3 Bucket Name.
- Enter the S3 Bucket System Region (e.g., us-east-2).
- Enter an optional S3 Folder Prefix to upload the exports to.
- Enter the S3 Storage Class you would like us to use (e.g., Standard, Standard Infrequent Access, etc.). See list of storage classes here.
- If the bucket is encrypted with a KMS key, specify the KMS Key ARN as well, otherwise we will encrypt the data with
SSE_S3. - Click "Populate Role ARN" and our system will create a role for your project in our AWS account for exporting data to your S3 bucket. The role ARN will look something like:
arn:aws:iam::123456789012:role/EES3-RK-AAAAAA-Project-Name - Click "Test S3 Upload" to test that all settings are correct.
- Save export settings.
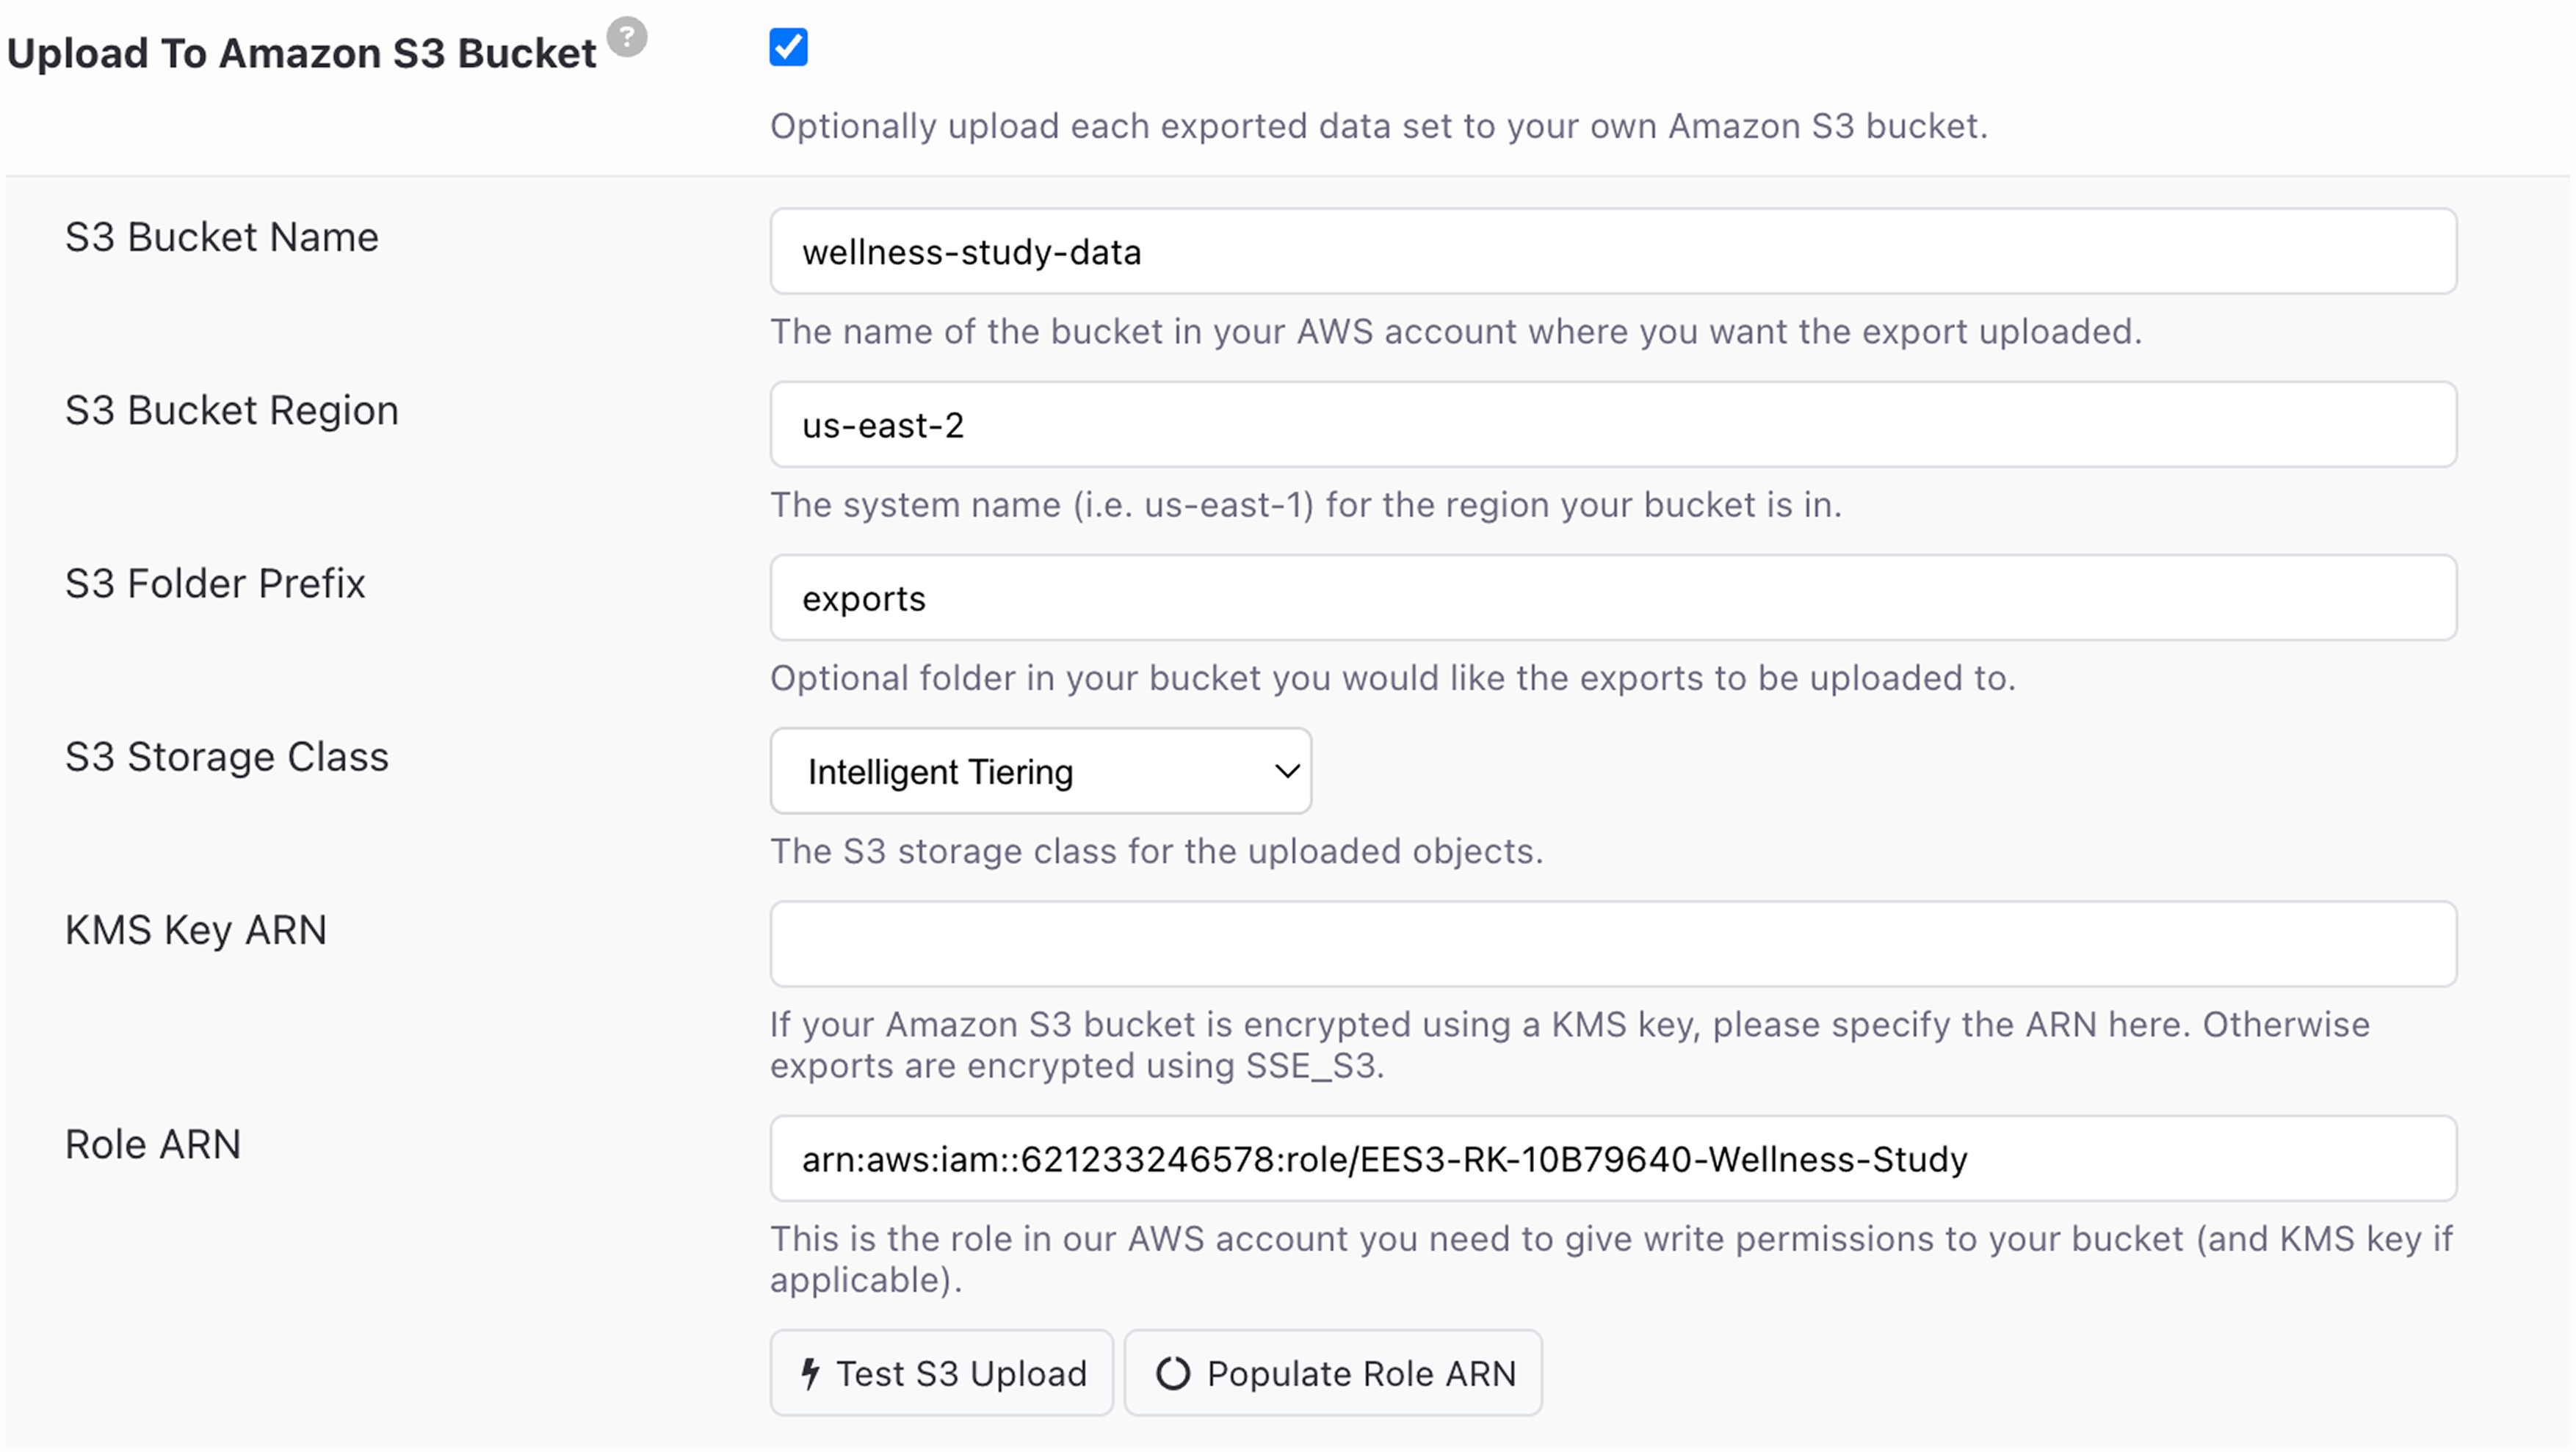
Once the Role ARN has been generated and your S3 export settings have been saved, add the following to your S3 bucket's policy:
{
    "Effect": "Allow",
    "Principal": {
        "AWS": "arn:aws:iam::123456789012:role/EES3-RK-AAAAAA-Project-Name"
    },
    "Action": [
        "s3:GetObject",
        "s3:GetObjectAcl",
        "s3:ListBucket",
        "s3:PutObject",
        "s3:PutObjectAcl"
    ],
    "Resource": [
        "arn:aws:s3:::your-bucket-name",
        "arn:aws:s3:::your-bucket-name/*"
    ]
}
Additionally, if your bucket is encrypted with a KMS key, you will need to add the following to the KMS key policy:
{
    "Effect": "Allow",
    "Principal": {
        "AWS": "arn:aws:iam::123456789012:role/EES3-RK-AAAAAA-Project-Name"
},
    "Action": [
        "kms:Encrypt",
        "kms:Decrypt",
        "kms:ReEncrypt*",
        "kms:GenerateDataKey*",
        "kms:DescribeKey"
],
    "Resource": "your-kms-key-arn"
}
Sync Export Database to Amazon S3 Bucket
Instead of (or in addition to) transferring each incremental export to an Amazon S3 bucket, you have the option to sync the export database to an Amazon S3 bucket as parquet files. The export database is what the Export Explorer uses to run SQL queries across your project's export data or to make external connections to your data analysis applications.
In order for MyDataHelps Designer to sync the export database to your S3 bucket, you can follow the same instructions above to Upload to Amazon S3 Bucket within the the Sync Export Database to Amazon S3 Bucket setting.
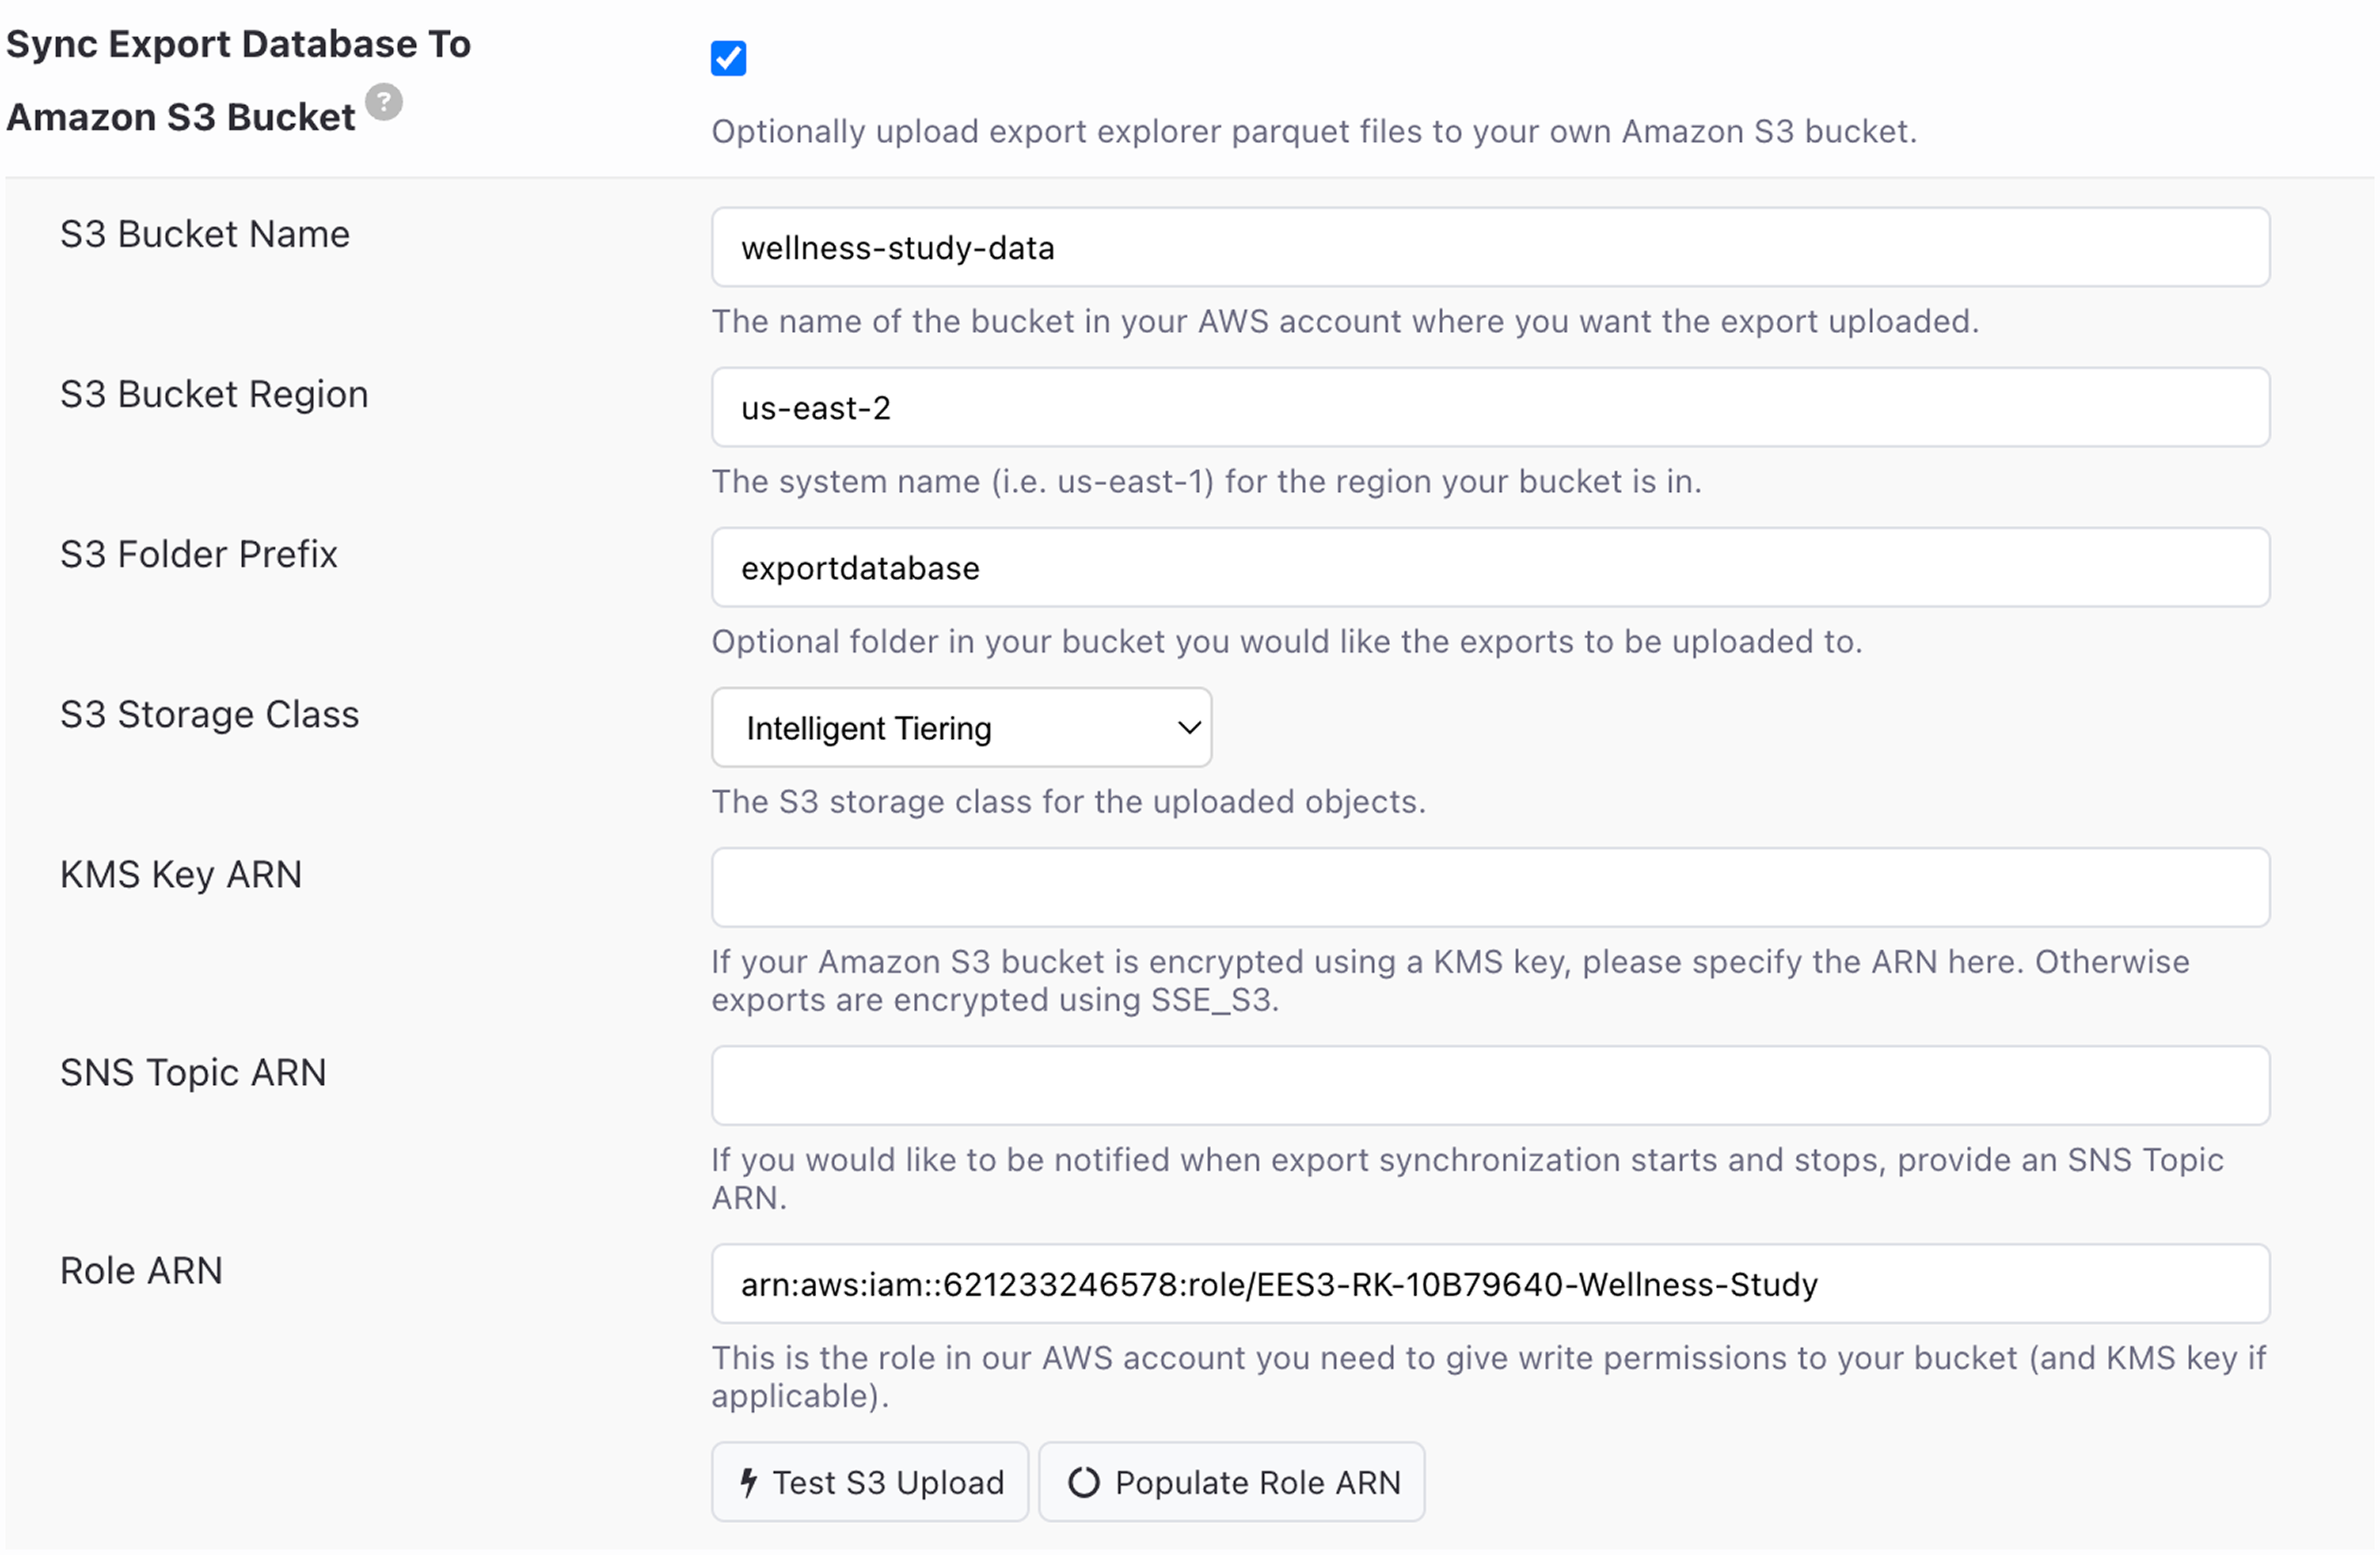
You'll use a bucket policy similar to:
{
    "Effect": "Allow",
    "Principal": {
        "AWS": "arn:aws:iam::123456789012:role/EES3-RK-AAAAAA-Project-Name"
    },
    "Action": [
        "s3:GetObject",
        "s3:GetObjectAcl",
        "s3:ListBucket",
        "s3:PutObject",
        "s3:PutObjectAcl",
        "s3:DeleteObject",
        "s3:ListBucketMultipartUploads",
        "s3:AbortMultipartUpload",
        "s3:ListMultipartUploadParts",
    ],
    "Resource": [
        "arn:aws:s3:::your-bucket-name",
        "arn:aws:s3:::your-bucket-name/*"
    ]
}
Configure a KMS key policy similar to:
{
    "Effect": "Allow",
    "Principal": {
        "AWS": "arn:aws:iam::123456789012:role/EES3-RK-AAAAAA-Project-Name"
},
    "Action": [
        "kms:Encrypt",
        "kms:Decrypt",
        "kms:ReEncrypt*",
        "kms:GenerateDataKey*",
        "kms:DescribeKey"
],
    "Resource": "your-kms-key-arn"
}
In addition to your KMS key policy, you have the option to provide a SNS Topic ARN, which can notify you when export synchronization starts and stops. If specified, the SNS Topic policy must be similar to:
{
   "Sid": "MyDataHelpsPublish",
   "Effect": "Allow",
   "Principal": {
      "AWS": "arn:aws:iam::621233246578:role/EES3-RK-10B79640-General-Research-Study"
   },
   "Action": "SNS:Publish",
   "Resource": "your-topic-arn"
}
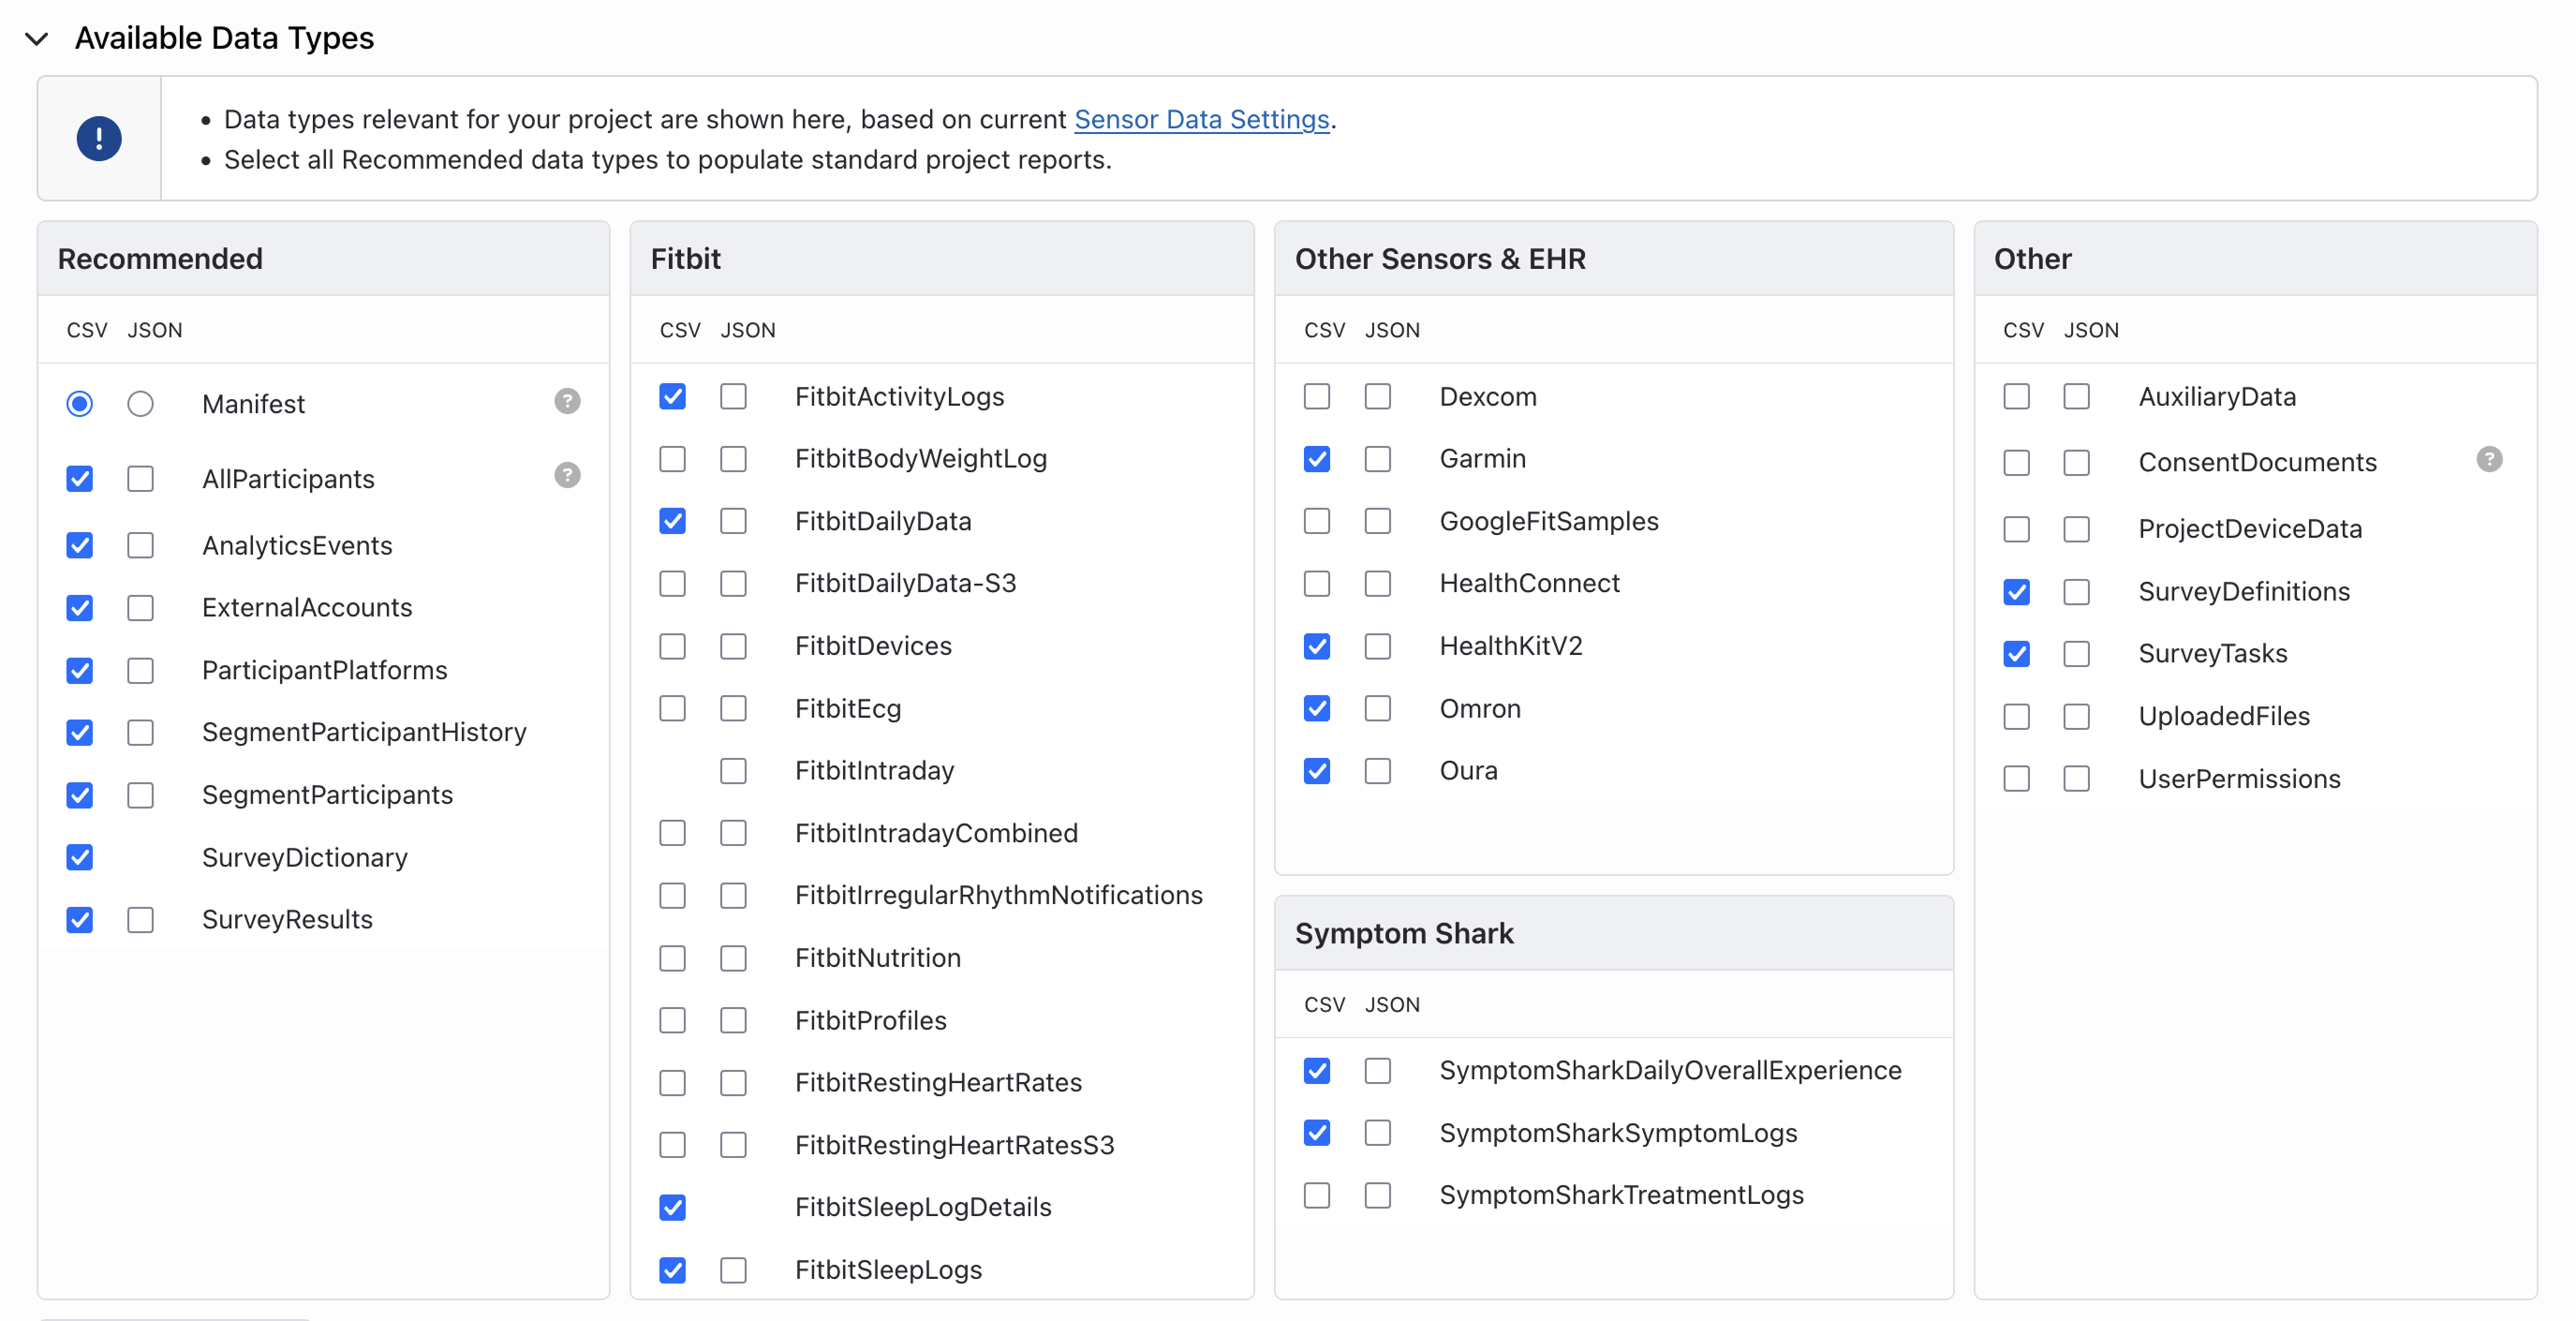
Available Data Types
Data types relevant to your project will be shown here based on Sensor and EHR data settings. All projects by default can access Recommended, Symptom Shark, and Other export data types. To export Sensor and EHR data, you must first enable collection of Sensor & EHR Data before you can select their data types to export. For more detail on what each data type export includes, see Export File Type and Format Summary.
To populate standard project reports in the Reporting tab, enable all Recommended exports (in either format).
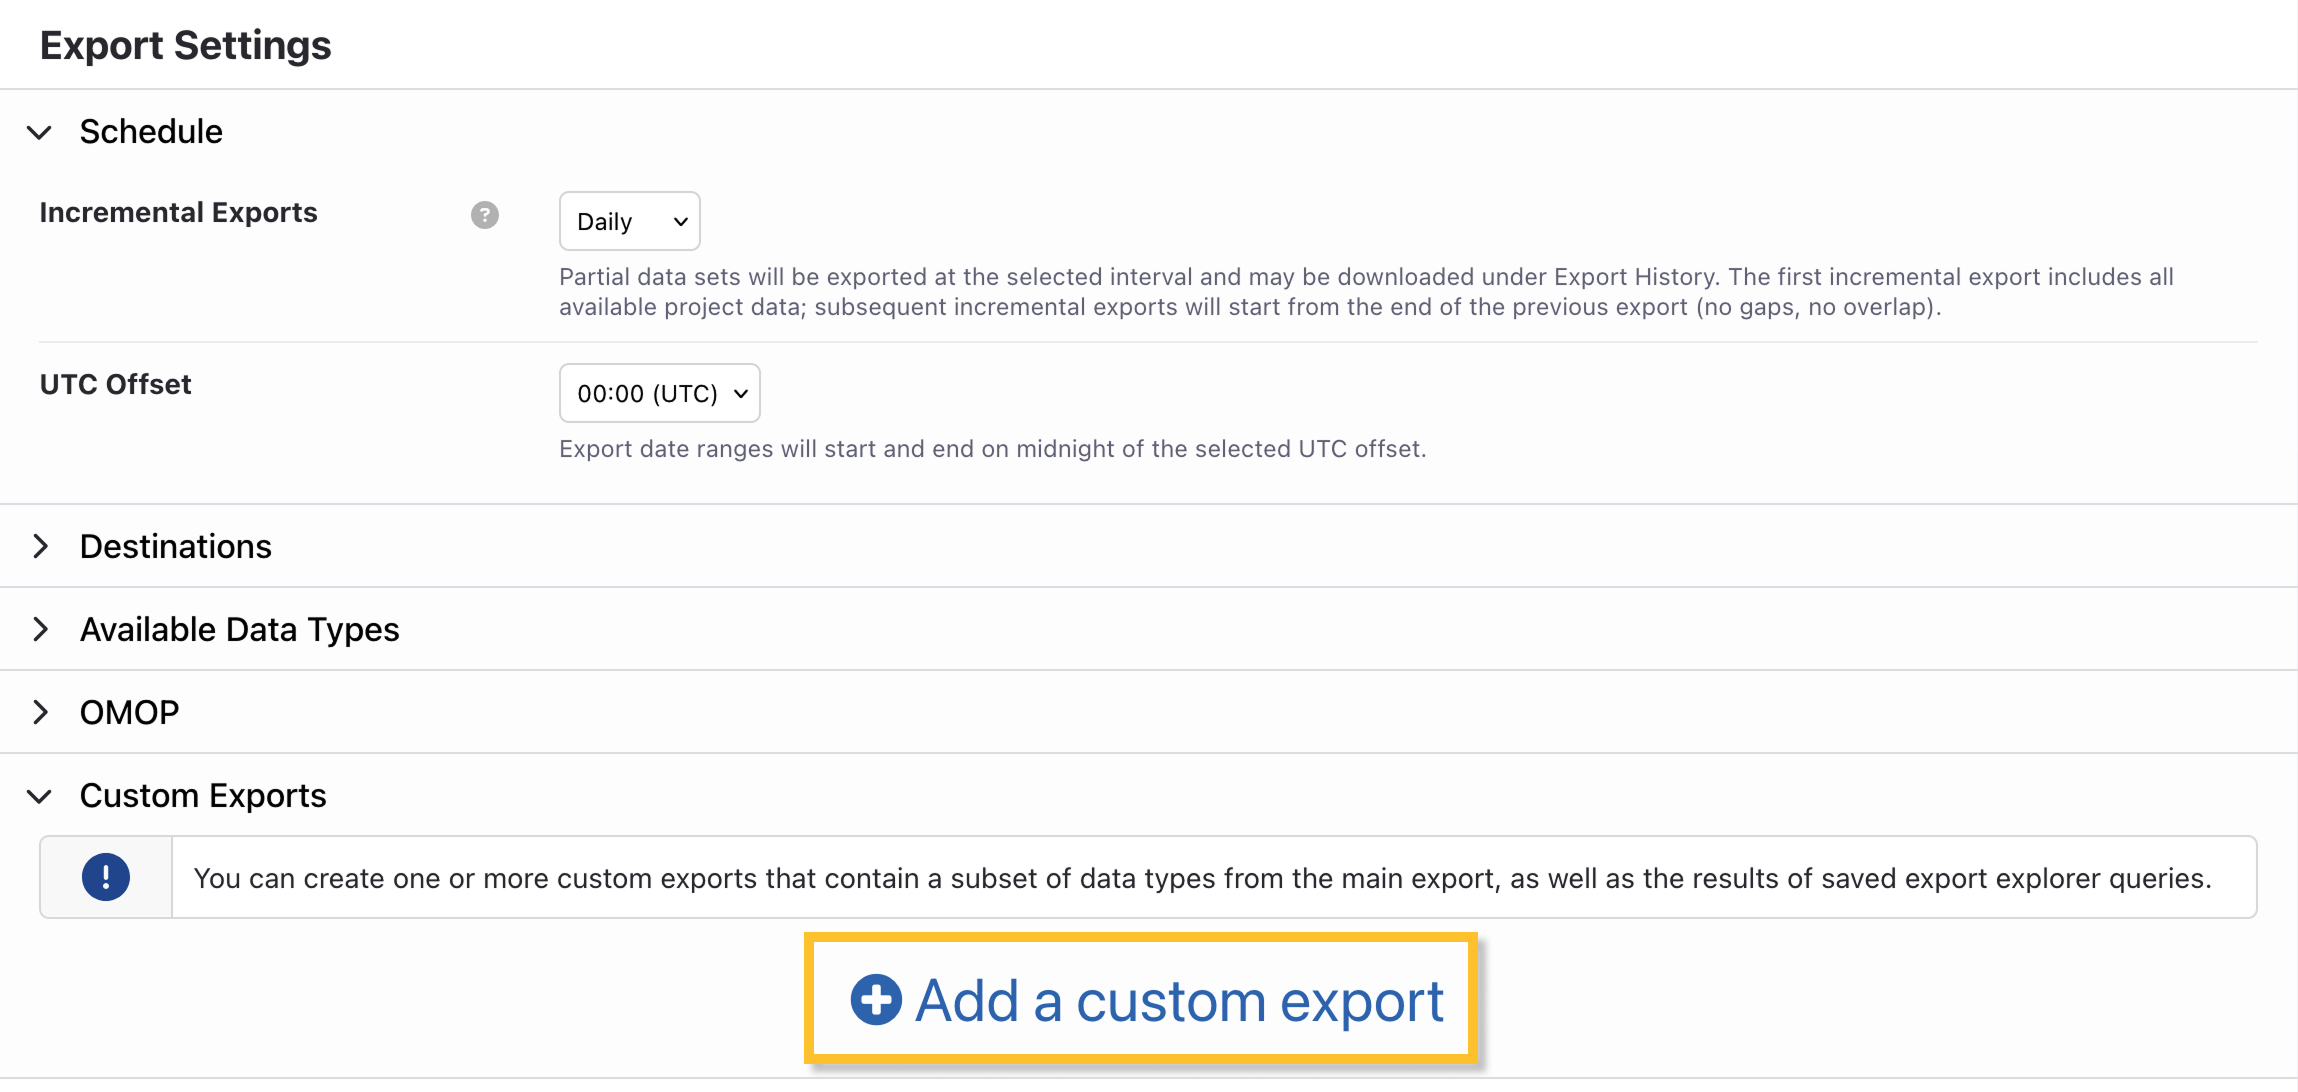
Custom Exports
In addition to the incremental export of selected data types, MyDataHelps Designer supports custom exports of saved Export Explorer queries and any subset(s) of selected data types from the incremental export. You may create multiple custom exports per project, with each appearing distinctly in the Export History. Custom exports occur on the same interval as the standard export.
If there is a preferred data format your team wants or if you want to receive aggregated data—rather than incremental data—you should use a custom export that leverages your saved Export Explorer queries. See more below for how to implement this.
To create a custom export, first click "Add a custom export."
Next, configure settings for your export as follows:
- Name your export
- Optionally, choose to upload the export to an SFTP server and/or an Amazon S3 bucket.
- Each custom export can be sent to a unique destination, allowing for dashboards, automated reporting, or data analysis pipelines.
- They may also be sent to the same location as the main project export, however all credentials will need to be entered distinctly for each export.
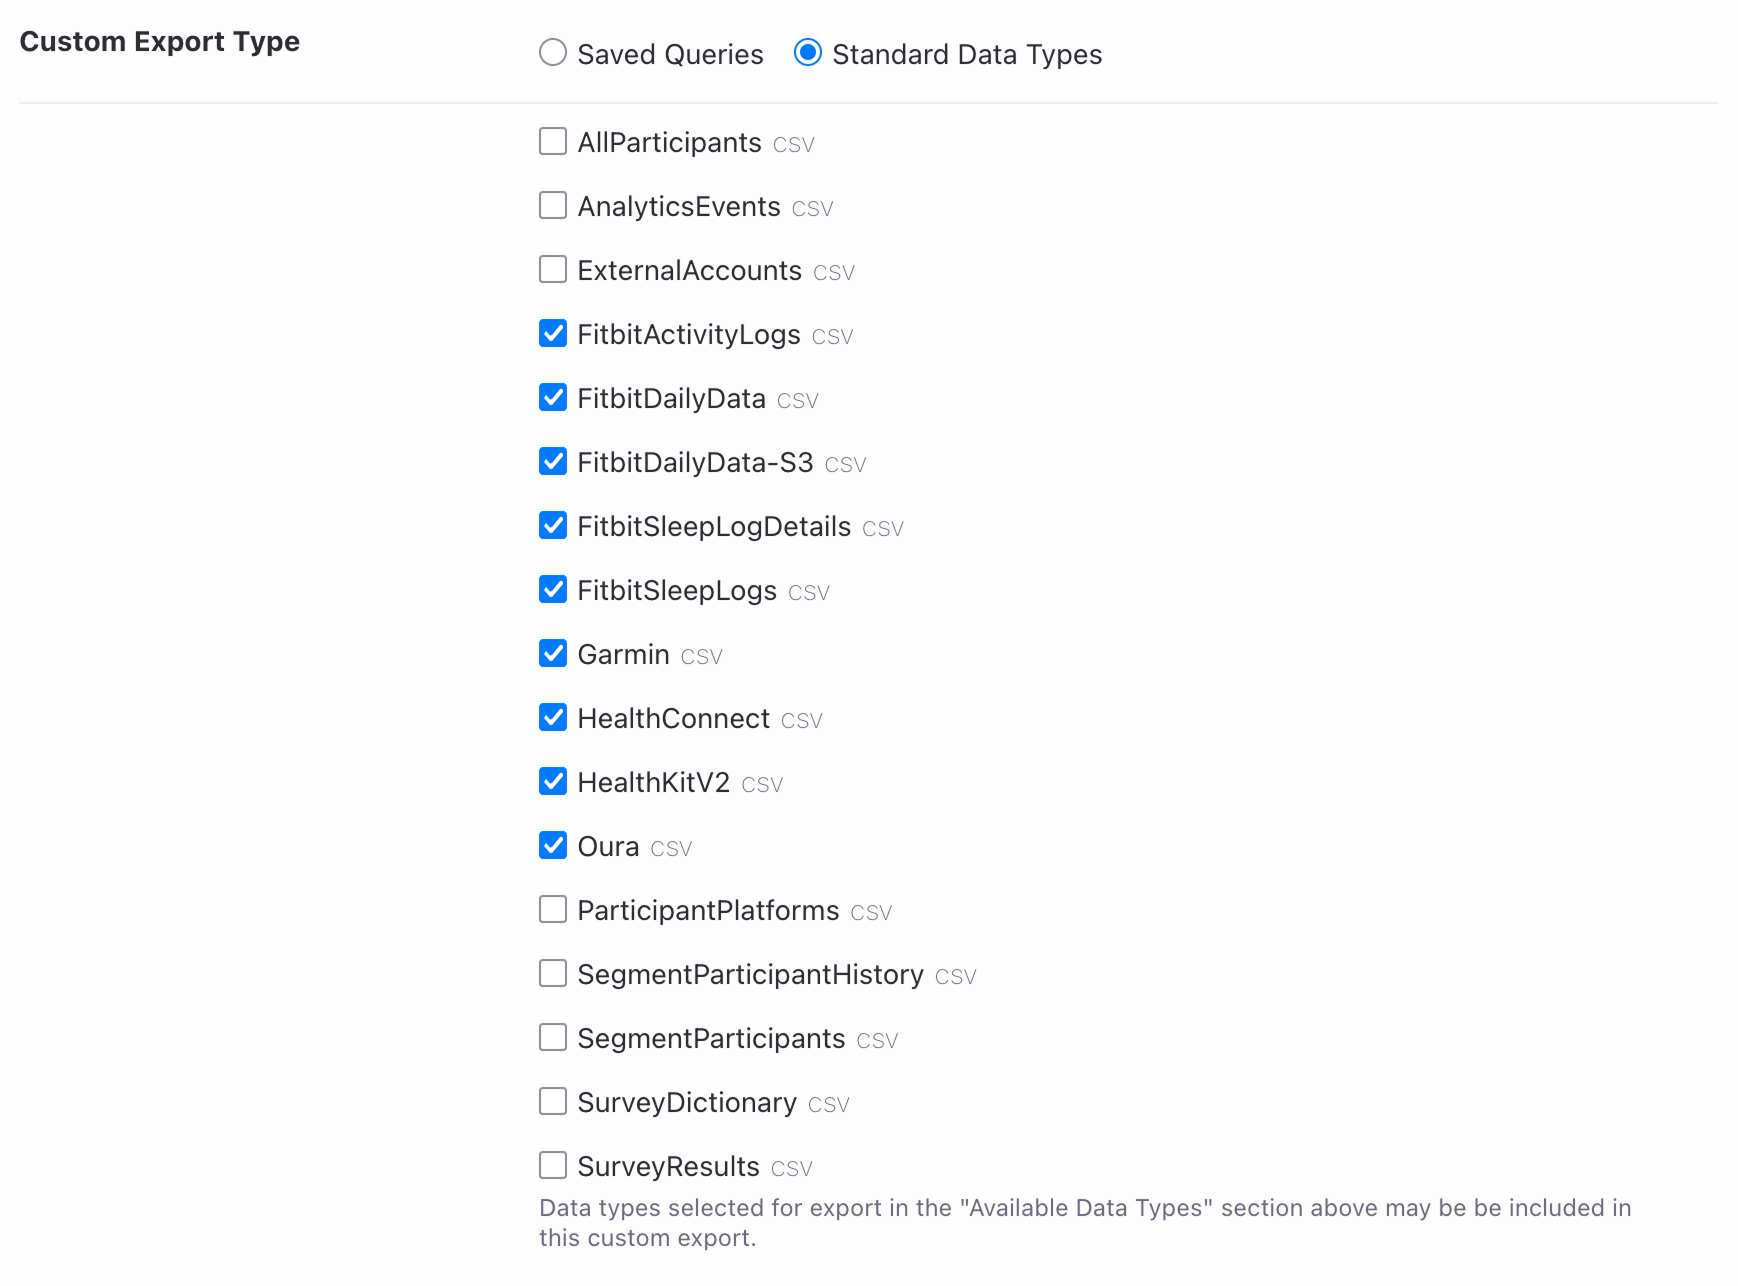
- Select the type of export, either Saved Queries or Standard Data Types.

A "Saved Queries" export allows you to export saved Export Explorer queries, useful for powering external dashboards or providing anonymized data to external researchers.

A "Standard Data Types" export allows you to select a subset of any files included in the standard export, in the same format. This can be used to distribute unique datasets for analytics teams, or training AI models. In the example below, only sensor data would be included in this custom export.
After configuring your custom export, click "Add" to create another custom export and "Save Export Settings" once you have made all export configuration updates.
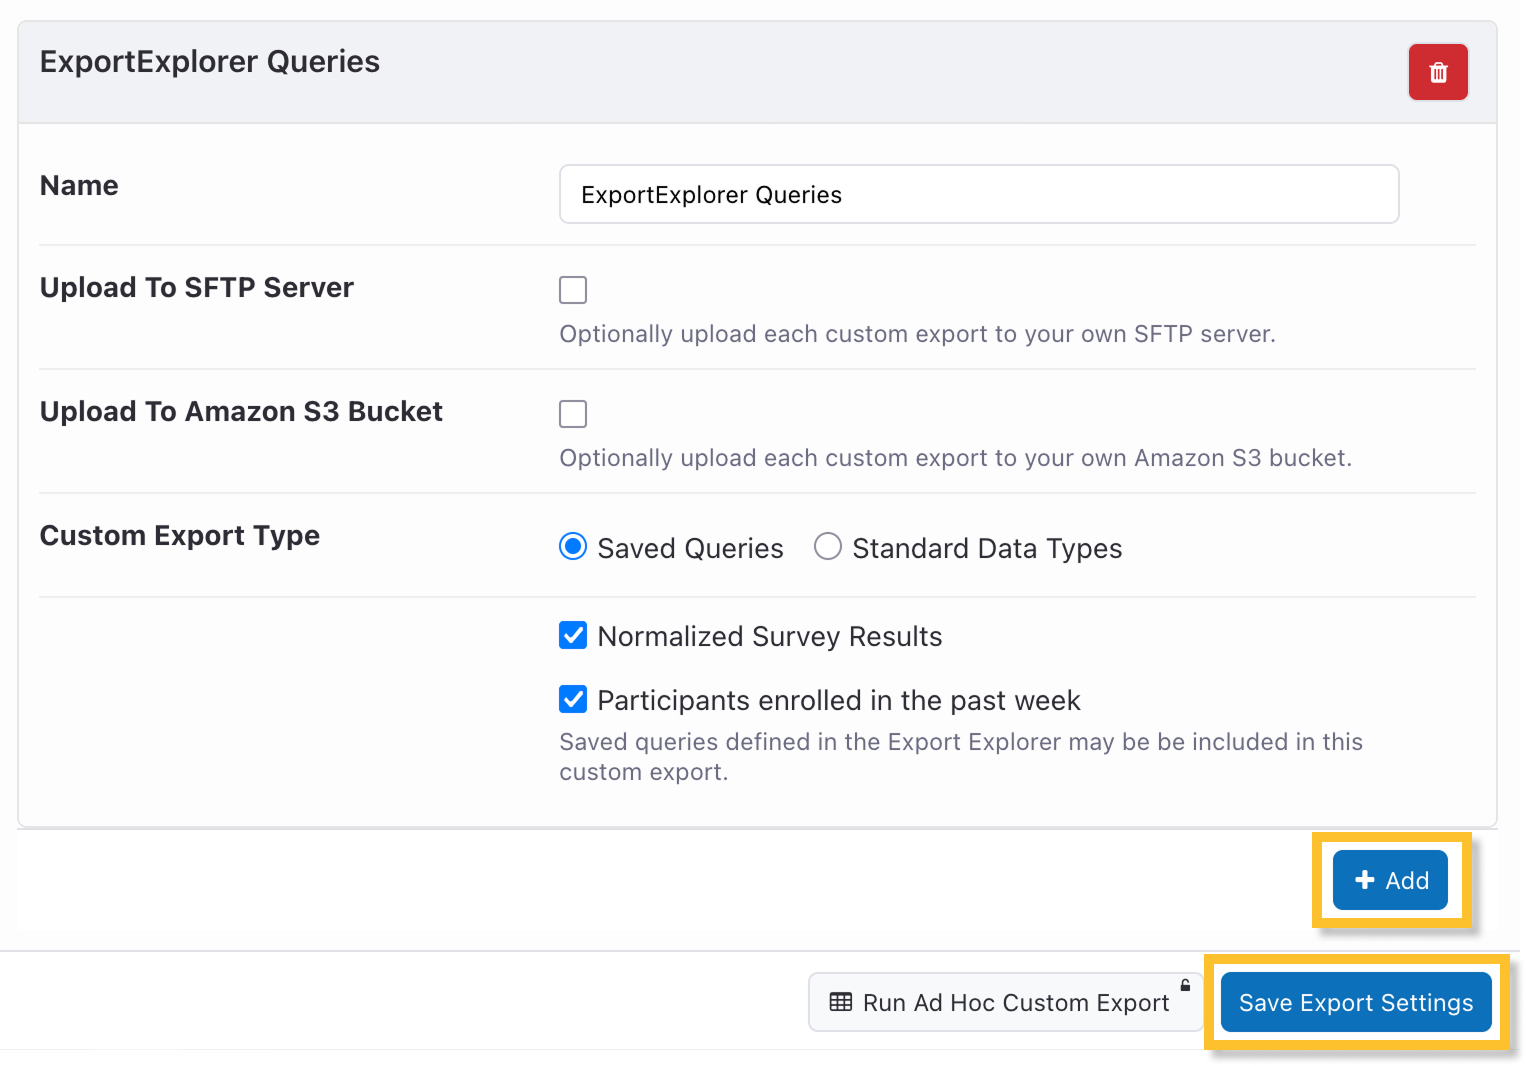
You may delete a custom export at any time using the trash can icon. Previous exports of this custom export will remain in Export History.
Troubleshooting Errors
When making updates to the Data Export, it is essential that you click the blue "Save Export Settings" button at the bottom of the page before testing or exiting. This should always be your first step in troubleshooting. See the scenarios below for additional troubleshooting tips:
- "Key 'OpenSSH' is not supported." This error appears at the top of the Data Export screen and indicates that the SFTP User Key needs to be updated to the default key generation format, as described in the previous section.

- "Upload Error: An established connection was aborted by server." This error will appear on the attempted data export within the Export History tab and indicates that your network may be rejecting the connection attempt. In this case, you should confirm with your organization's IT whether you can connect to the SFTP server from outside your network with a standard SFTP client. If possible, whitelist the following IP address: 52.200.215.173.
