
The final step in configuring the schedule is determining which action(s) to take based on the schedule type and settings previously defined. Available actions are found at the bottom of the schedule.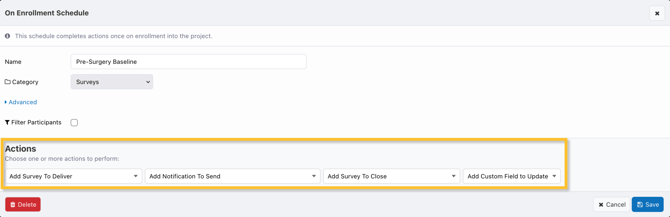 For more information on how to determine which schedule actions you may need for your project, as well as an advanced schedule example, see the Scheduling Playbook article.
Add Survey to Deliver
Use the “Add Survey To Deliver” action to deliver a published survey to a participant as a task. Optionally, choose an Event to associate with the survey task, a due date, and whether the survey task should automatically close based on the due date. Use the up and down arrows on the right to change the order in which they are assigned.
Surveys will generally appear in the order assigned, but you can fully customize the order surveys appear to participants using a Task List in App Designer.

If participants already have an assigned task of a particular survey, the existing task will be closed and a new one will be delivered. This has no effect on the participant experience except for a potentially different due date (if configured), but is captured in the data export.
Due Date
You can optionally set a survey due date in the "Due" column, specifying how long a participant has to complete it. The due date can:
-
Determine when the survey closes, either via a Close Survey action or Auto-Close.
-
Be used as criteria for segments and other schedules (e.g. sending a notification when a survey task is due soon).
- Show participants when they are due in their Survey Task List, and optionally determine the order surveys appear there.
There are three ways to configure a survey due date:
-
"Never Due" means no due date is set.
-
"Due precisely after" sets a precise due date with granular time intervals. The time interval starts when the schedule runs, e.g. a survey delivered Monday at 9 AM and set to 4 "Day(s)" will be due at 9 AM on Friday. Available intervals include "Minute(s)" and "Hour(s)", enabling a survey like an EMA to be due (and close) exactly one hour from when it is delivered.
- "Due at the end of the day after" sets the due date to the end of the participant's calendar day after the time interval has elapsed. For example, if participants are assigned a survey at 9AM on Monday and set to be due in 4 "Day(s)", it will be due at 11:59PM Friday.

Auto-Close
Survey tasks can be automatically set to "Closed" status if they have not been completed when their due date is reached using the Auto-Close checkbox. If unchecked and the participant does not complete the survey, it will remain incomplete until closed by another schedule using a close survey action or manually.
Add Notification to Send
Use the "Add Notification To Send" action to send a push notification, SMS message, or email to the targeted participants. Select from notifications that are defined and published in the notification library.

There may be instances where you need to send an SMS notification to multiple phone numbers, or an email notification to multiple email addresses. To accomplish this, first you need to create custom fields with a data type of phone or email. Once the custom fields are defined, you can add the notification under the schedule actions as many times as necessary and select which custom fields to use.

Add Survey to Close
Use the “Add Survey To Close” action to set the status of “Incomplete” surveys to either “Complete” or “Closed.” Once a survey is closed, it is no longer available for applicable participants to complete.
The "Add Survey To Close" action allows you to leave surveys open past their due date, but still close them later if incomplete. If you need surveys to be closed when they are due, use the Auto-Close option when delivering the survey.
Any matching survey tasks with status “Complete” or “Closed” status when the schedule runs will be unaffected by this action. To better understand the different survey statuses, visit the Viewing and Closing Survey Tasks article.

Add Custom Field to Update
Use the “Add Custom Field to Update” category to populate a previously defined custom field when the schedule triggers. Depending on the custom field type (e.g., Text, Date, etc.), you can update your custom field to a variety of values using schedules — see the table below for more details.
| Set Value To | Description | Supported Custom Field Types |
|---|---|---|
| A Specific Value | Always sets the custom field to the same value when the schedule is triggered, e.g., update ParticipantStatus to "Enrolled" on enrollment. | All Types |
| A CEL Expression | Sets the custom field value based on the specified CEL expression, e.g., update DailySurveyCounter to "customFields.DailySurveyCounter+1" every time a participant completes their daily survey. | All Types |
| Current Date / Time | Sets the custom field value to the current date and/or time. | Date, Timestamp |
| Random Value From List | Sets the custom field to a random value from the specified list, e.g., assign a Cohort on enrollment. See the Project Randomization Playbook article for more information. | Text |
As of 9/15/2026, new schedules use the Common Expression Language instead of the expression syntax. Previously created schedules using the expression syntax will continue to work.
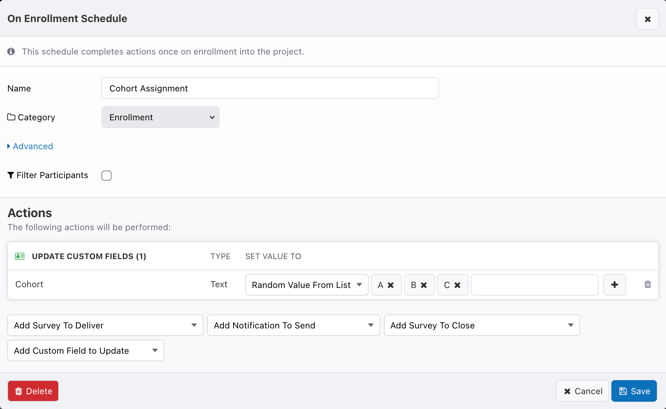
The example schedule below randomly assigns each participant to either cohort A, B, or C on enrollment.
Add Webhook to Call
If you have configured a scheduled webhook, you can add a call to it as an action for your schedules. Please refer to the webhook article for more information.
Schedule Action Order
In most scenarios, the order in which schedule actions run for a particular schedule is irrelevant. However, for scenarios where the action order may matter, schedule actions run in the following order:
-
Set Custom Field
-
Close Survey
-
Send Survey
-
Call Webhook
-
Send Notification
For example, if your schedule sets a custom field value that is then piped in a notification sent by the same schedule, the custom field will be updated before the notification is sent.